
大佬讲解入口
OpenGL学习脚印:模型加载初步-加载obj模型(load obj model) ,作者:The fool
OpenGL学习脚印-AssImp模型加载 ,作者:The fool
本人主要通过程序流程理解程序代码
创建对象
Model ourModel("文件路径(.obj文件)");
.obj文件存储模式参照最上方大佬文章。
Model类存储的public成员有
vector<Texture> textures_loaded;//存储到目前为止加载的所有纹理,优化以确保纹理不会加载超过一次。
vector<Mesh>    meshes;
string directory;
bool gammaCorrection;
Model类的构造函数
Model(string const& path, bool gamma = false) : gammaCorrection(gamma)
{
    loadModel(path);
}
通过loadmodel检查并加载数据
void loadModel(string const& path)
{
    // read file via ASSIMP
    Assimp::Importer importer;//c++接口
    const aiScene* scene = importer.ReadFile(path, aiProcess_Triangulate | aiProcess_GenSmoothNormals | aiProcess_FlipUVs | aiProcess_CalcTangentSpace);//读取数据并做部分处理,返回根节点
    // check for errors
    if (!scene || scene->mFlags & AI_SCENE_FLAGS_INCOMPLETE || !scene->mRootNode) // 检查读取是否正确
    {
        cout << "ERROR::ASSIMP:: " << importer.GetErrorString() << endl;
        return;
    }
    // retrieve the directory path of the filepath
    directory = path.substr(0, path.find_last_of('/'));//保存根目录

    // process ASSIMP's root node recursively
    processNode(scene->mRootNode, scene);//处理结点
}
根据官方文档解释
Importer类为Open Asset Import Library的功能形成了一个c++接口。
首先创建 Assimp::Importer的示例
然后通过它的l Assimp::Importer::ReadFile()方法加载模型
const aiScene* Assimp::Importer::ReadFile(const char *pFile,unsigned int pFlags )
pFlags为导入成功后执行的可选后处理步骤,是一些后期处理(Post-processing)的选项,可在官网找到具体的信息。
例如:
- aiProcess_Triangulate,我们告诉Assimp,如果模型不是(全部)由三角形组成,它需要将模型所有的图元形状变换为三角形。
- aiProcess_FlipUVs将在处理的时候翻转y轴的纹理坐标
- aiProcess_GenNormals:如果模型不包含法向量的话,就为每个顶点创建法线。
- aiProcess_SplitLargeMeshes:将比较大的网格分割成更小的子网格,如果你的渲染有最大顶点数限制,只能渲染较小的网格,那么它会非常有用。
- aiProcess_OptimizeMeshes:和上个选项相反,它会将多个小网格拼接为一个大的网格,减少绘制调用从而进行优化。
aiScene–这是Assimp数据接口的根对象。一旦我们有了这个场景对象,我们就能访问到加载后的模型中所有所需的数据了。
if (!scene || scene->mFlags & AI_SCENE_FLAGS_INCOMPLETE || !scene->mRootNode)检查场景和其根节点不为null,并且检查了它的一个标记(Flag),来查看返回的数据是不是不完整的。
设置参数directory = path.substr(0, path.find_last_of('/'));保存根目录路径。
如果没有错误,则通过processNode(scene->mRootNode, scene);处理场景中的所有节点,所以我们将第一个节点(根节点)传入了递归的processNode函数。
processNode递归处理结点载入mesh类
// processes a node in a recursive fashion. Processes each individual mesh located at the node and repeats this process on its children nodes (if any).以递归方式处理节点。处理位于该节点上的每个网格,并在其子节点(如果有)上重复此过程。
void processNode(aiNode* node, const aiScene* scene)
{
   // process each mesh located at the current node处理当前结点的每个网络
   for (unsigned int i = 0; i < node->mNumMeshes; i++)
   {
       // the node object only contains indices to index the actual objects in the scene.
       // the scene contains all the data, node is just to keep stuff organized (like relations between nodes).
       aiMesh* mesh = scene->mMeshes[node->mMeshes[i]];
       meshes.push_back(processMesh(mesh, scene));//递归扫描,将模型数据存储在vector<mesh>中
   }
   // after we've processed all of the meshes (if any) we then recursively process each of the children nodes处理当前结点的所有子节点
   for (unsigned int i = 0; i < node->mNumChildren; i++)
   {
       processNode(node->mChildren[i], scene);
   }

}
到这里可能已经懵了,让我们来看看assimp内部了类


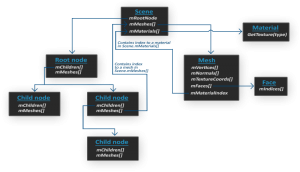
这里对上述图作简要说明:
-
aiScene 作为AssImp加载模型的根数据结构,保存了从模型加载的顶点位置、法向量、纹理、光照等数据,例如它通过数组mMeshes保存Mesh数据,通过mMaterials保存材质数据。总之aiScene保存了加载的模型数据,其余类通过索引aiScene中存储的对象来获取对应的数据。
-
aiNode 模型通过层次结构存储,根节点mRootNode保存在aiScene中,根节点下面有0至多个子节点,每个节点通过aiNode类表达,aiNode中包含一个或者多个Mesh,注意这里的Mesh是对aiScene中Mesh数据的一个索引。
-
aiMesh是上一节中所讲的Mesh对象,Mesh中包含顶点位置数据、法向量、纹理数据,每个Mesh可以包含一个或者多个Face。
-
aiFace是一个面,一般来讲在读取模型时通过后处理选项(post-process flag)将模型转换为三角形网格,那么这里的面主要是三角形面。后处理选项稍后介绍。通过三角形面,我们可以获取渲染模型需要的索引数据。
原文链接:https://blog.csdn.net/wangdingqiaoit/article/details/52014321
代码讲解:
- 在
void processNode(aiNode* node, const aiScene* scene)中node是我们需要加载的模型结点,但它只是个索引,真正的数据要到scene中去找。所以还需要常量指针const aiScene* scene指向具体数据。 aiMesh* mesh = scene->mMeshes[node->mMeshes[i]]; meshes.push_back(processMesh(mesh, scene));
将该结点内的每一个Mesh(对aiScene中Mesh数据的一个索引)进行processMesh(mesh, scene)操作,该操作会在下面详细解释。processNode(node->mChildren[i], scene);循环遍历每一个子节点迭代。
因此该函数的意义便是自上(根节点)到下(子节点)导出所有结点的mesh对象(数据的一个索引),进行processMesh(mesh, scene)操作,并将返回值存储在meshes容器中。
processMesh(mesh, scene)处理mesh对象
    Mesh processMesh(aiMesh* mesh, const aiScene* scene)
    {
        // data to fill
        vector<Vertex> vertices;
        vector<unsigned int> indices;
        vector<Texture> textures;

        // 遍历网格的每个顶点
        for (unsigned int i = 0; i < mesh->mNumVertices; i++)//mNumVertices存储了顶点数量
        {
            Vertex vertex;//Vertex结构体在Mesh.h中有定义
            glm::vec3 vector; // 我们声明了一个占位符向量,因为assimp使用它自己的向量类,它不会直接转换到glm的vec3类,所以我们首先将数据转换到这个占位符glm::vec3。
            // positions
            vector.x = mesh->mVertices[i].x;
            vector.y = mesh->mVertices[i].y;
            vector.z = mesh->mVertices[i].z;
            vertex.Position = vector;//将该点数据存储在结构体中
            // normals
            if (mesh->HasNormals())//同理存储法线(如果有的话)
            {
                vector.x = mesh->mNormals[i].x;
                vector.y = mesh->mNormals[i].y;
                vector.z = mesh->mNormals[i].z;
                vertex.Normal = vector;
            }
            // texture coordinates
            if (mesh->mTextureCoords[0]) //加载纹理坐标
            {
                glm::vec2 vec;
                // 一个顶点最多可以包含8个不同的纹理坐标. 因此,我们假设我们不会
                // 使用顶点可以有多个纹理坐标的模型,所以我们总是取第一个集合(0)。
                vec.x = mesh->mTextureCoords[0][i].x;
                vec.y = mesh->mTextureCoords[0][i].y;
                vertex.TexCoords = vec;
                // tangent
                vector.x = mesh->mTangents[i].x;
                vector.y = mesh->mTangents[i].y;
                vector.z = mesh->mTangents[i].z;
                vertex.Tangent = vector;
                // bitangent
                vector.x = mesh->mBitangents[i].x;
                vector.y = mesh->mBitangents[i].y;
                vector.z = mesh->mBitangents[i].z;
                vertex.Bitangent = vector;
            }
            else
                vertex.TexCoords = glm::vec2(0.0f, 0.0f);

            vertices.push_back(vertex);
        }
        // 现在遍历网格的每个面(面是网格的三角形)并检索相应的顶点索引。
        for (unsigned int i = 0; i < mesh->mNumFaces; i++)
        {
            aiFace face = mesh->mFaces[i];
            // retrieve all indices of the face and store them in the indices vector
            for (unsigned int j = 0; j < face.mNumIndices; j++)//每个面都有顶点索引
                indices.push_back(face.mIndices[j]);//将索引存储在容器中,类似于VEO
        }
        // 处理材料
        aiMaterial* material = scene->mMaterials[mesh->mMaterialIndex];
        // 我们假设在着色器中采样器名称有一个约定。每个漫反射纹理都应该被命名
        // 为'texture_diffuseN',其中N是一个从1到MAX_SAMPLER_NUMBER的连续数字。
        // 这同样适用于其他纹理,如下列表总结:
        // diffuse: texture_diffuseN
        // specular: texture_specularN
        // normal: texture_normalN

        // 1. diffuse maps
        vector<Texture> diffuseMaps = loadMaterialTextures(material, aiTextureType_DIFFUSE, "texture_diffuse");
        textures.insert(textures.end(), diffuseMaps.begin(), diffuseMaps.end());
        // 2. specular maps
        vector<Texture> specularMaps = loadMaterialTextures(material, aiTextureType_SPECULAR, "texture_specular");
        textures.insert(textures.end(), specularMaps.begin(), specularMaps.end());
        // 3. normal maps
        std::vector<Texture> normalMaps = loadMaterialTextures(material, aiTextureType_HEIGHT, "texture_normal");
        textures.insert(textures.end(), normalMaps.begin(), normalMaps.end());
        // 4. height maps
        std::vector<Texture> heightMaps = loadMaterialTextures(material, aiTextureType_AMBIENT, "texture_height");
        textures.insert(textures.end(), heightMaps.begin(), heightMaps.end());

        // return a mesh object created from the extracted mesh data
        return Mesh(vertices, indices, textures);
    }
loadMaterialTextures函数如下:
// checks all material textures of a given type and loads the textures if they're not loaded yet.
    // the required info is returned as a Texture struct.
    vector<Texture> loadMaterialTextures(aiMaterial* mat, aiTextureType type, string typeName)
    {
        vector<Texture> textures;
        for (unsigned int i = 0; i < mat->GetTextureCount(type); i++)//检查储存在材质中(该类型)纹理的数量
        {
            aiString str;
            mat->GetTexture(type, i, &str);//获取每个纹理的文件位置,它会将结果储存在一个aiString中
            // check if texture was loaded before and if so, continue to next iteration: skip loading a new texture
            bool skip = false;
            for (unsigned int j = 0; j < textures_loaded.size(); j++)
            {
                if (std::strcmp(textures_loaded[j].path.data(), str.C_Str()) == 0)
                {
                    textures.push_back(textures_loaded[j]);
                    skip = true; // a texture with the same filepath has already been loaded, continue to next one. (optimization)
                    break;
                }
            }
            if (!skip)
            {   // if texture hasn't been loaded already, load it
                Texture texture;
                texture.id = TextureFromFile(str.C_Str(), this->directory);//将会(用stb_image.h)加载一个纹理并返回该纹理的ID。
                texture.type = typeName;
                texture.path = str.C_Str();
                textures.push_back(texture);//在该容器中存储的只有id,类型和路径,对应特定的网络mesh
                textures_loaded.push_back(texture);  // 将其存储为整个模型加载的纹理,以确保我们不会不必要地加载重复的纹理。
            }
        }
        return textures;
    }
};
TextureFromFile函数及使用stb_image.h加载纹理的函数,在之前已有介绍。
补充(2020.10.5):
return Mesh(…,…,…,);这里new了一个Mesh类,从这里进入了Mesh类的内部构造。
// constructor
    Mesh(vector<Vertex> vertices, vector<unsigned int> indices, vector<Texture> textures)
    {
        this->vertices = vertices;//存储了顶点,法线,纹理坐标等
        this->indices = indices;//EBO
        this->textures = textures;//纹理

        // now that we have all the required data, set the vertex buffers and its attribute pointers.
        setupMesh();
    }
关键在于三个容器存储的数据类型。
void setupMesh()
    {
        // create buffers/arrays
        glGenVertexArrays(1, &VAO);
        glGenBuffers(1, &VBO);
        glGenBuffers(1, &EBO);

        glBindVertexArray(VAO);
        // 将数据加载入VAO
        glBindBuffer(GL_ARRAY_BUFFER, VBO);
        // 关于结构一个伟大的事情是,对于它的所有项,它们的内存布局是连序的。
        // 其效果是,我们可以简单地传递一个指向结构体的指针,它会完美地转换为glm::vec3/2数组,再转换为3/2浮点数,转换为字节数组。
        glBufferData(GL_ARRAY_BUFFER, vertices.size() * sizeof(Vertex), &vertices[0], GL_STATIC_DRAW);

        glBindBuffer(GL_ELEMENT_ARRAY_BUFFER, EBO);
        glBufferData(GL_ELEMENT_ARRAY_BUFFER, indices.size() * sizeof(unsigned int), &indices[0], GL_STATIC_DRAW);

        // set the vertex attribute pointers
        // vertex Positions
        glEnableVertexAttribArray(0);//顶点
        glVertexAttribPointer(0, 3, GL_FLOAT, GL_FALSE, sizeof(Vertex), (void*)0);
        // vertex normals
        glEnableVertexAttribArray(1);//法线
        glVertexAttribPointer(1, 3, GL_FLOAT, GL_FALSE, sizeof(Vertex), (void*)offsetof(Vertex, Normal));
        // vertex texture coords
        glEnableVertexAttribArray(2);//纹理坐标
        glVertexAttribPointer(2, 2, GL_FLOAT, GL_FALSE, sizeof(Vertex), (void*)offsetof(Vertex, TexCoords));
        // vertex tangent
        glEnableVertexAttribArray(3);//Tangent
        glVertexAttribPointer(3, 3, GL_FLOAT, GL_FALSE, sizeof(Vertex), (void*)offsetof(Vertex, Tangent));
        // vertex bitangent
        glEnableVertexAttribArray(4);//Bitangent
        glVertexAttribPointer(4, 3, GL_FLOAT, GL_FALSE, sizeof(Vertex), (void*)offsetof(Vertex, Bitangent));
        // ids
        glEnableVertexAttribArray(5);
        glVertexAttribIPointer(5, 4, GL_INT, sizeof(Vertex), (void*)offsetof(Vertex, m_BoneIDs));

        // weights
        glEnableVertexAttribArray(6);
        glVertexAttribPointer(6, 4, GL_FLOAT, GL_FALSE, sizeof(Vertex), (void*)offsetof(Vertex, m_Weights));
        glBindVertexArray(0);
    }
Model类构建的核心内容
Model ourModel("文件路径(.obj文件)"){//载入obj文件
	loadModel(path){//
		检查场景是否完整;
		记录地址string directory;
		processNode(scene->mRootNode, scene){//遍历所有的结点
			meshes.push_back(processMesh(mesh, scene)){//载入每个结点的每个网格
				将	vector<Vertex> vertices;//顶点,法向量,纹理坐标
        			vector<unsigned int> indices;//顶点索引
        			vector<Texture> textures{//纹理数据
						loadMaterialTextures{
							获取纹理地址;
							是否已经加载?已经加载则{
								texture.id = TextureFromFile(str.C_Str(), this->directory);//从该路径下加载该纹理
                				texture.type = typeName;
                				texture.path = str.C_Str();
							}
						}
					}
        		构造Mesh并返回给Mesh类容器存储数据。
			}
		}
	}
}
未知内容
- assimp是如何将obj文件加载为该种存储形式的
- importer.ReadFile中的第二个参数对模型的改变是如何进行的
assimp内部数据处理也是今后学习要点。


![[转]我国CAD软件产业亟待研究现状采取对策-卡核](https://www.caxkernel.com/wp-content/uploads/2024/07/frc-f080b20a9340c1a89c731029cb163f6a-212x300.png)