
OSGEARTH3 绘制热力图
在osgearth3的Examples已经添加了对热力图数据处理的例子,所以对热力图图层的封装也是基于Examples内的代码进行整合后的代码,方便上层应用使用。

OsgEarth3 的 HeatMap 例子
编译OsgEarth后,可以在bin下看到osgearth_heatmap.exe已经生成了,运行后提示如下信息,即需要设置热力图数据生成的各种参数:
- weighted:后面会让加一个points.txt文件,用于判断第三列是否用于权重值;
- min-level和max-level:对生成图层的瓦片模型层级范围进行限制;
- max_heat: 设置最大热度值,则Add每个点的权重值应当在 0~max_heat中获取;
- color相关的scheme可以不用,内部代码会用默认color;
- osg-options:用于创建图层设置的附加信息;
- out:是创建图层需要的属性,url、format,driver这些必要属性。

按参数对应设置,运行后其实就是生成指定影像文件,然后自行写个Viewer创建ImageLayer加载生成的影像文件调用即可看到效果。

例子大概就是这个意思,惭愧的是我并没有真正用这个exe处理热力图数据后生成影像文件,这个流程是我看源代码后梳理出的。
我想要流程是:输入热力图点集 -> 处理热力图数据到影像 -> 在地球上浏览热力图影像数据。所以我索性就直接把Examples内和Heatmap相关的源码拷出来,封装了CHeatMapLayer这样一个类去做热力图数据处理到影像图层,生成osgEarth::ImageLayer,写个viewer的Demo,将layer加到map中,直接看效果。
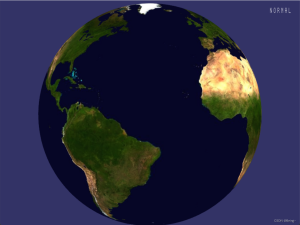
下面是我随机生成一个范围内热力值后的效果,瓦片级别0-20级:


在Example osgearth_heatmap内给的代码,我认为主要提供的是颜色表的插值处理,以及颜色处理到每个TileKey对应的影像数据上,写入ImageLayer。
重点的代码是heatmap.c内的颜色插值处理,以及osgearth_heatmap.cpp内WriteKeys函数内对每个TileKey的图像处理。
颜色表
源码内提供了一组“颜色表”,是官方提供的配色方案,可以直接用。当然,如果要自定义颜色信息,可以仿造生成heatmap_colorscheme_t,
heatmap.h内给的颜色方案的结构体,构造它即可:
typedef struct {
    const unsigned char* colors;  /* Color values in RGBA. */
    size_t ncolors;               /* Amount of colors (not amount of bytes or array size). */
} heatmap_colorscheme_t;
两种方法提供热力图的配色方案:
	1. 自定义 eg:
	const unsigned char mixed_data[] = {0, 0, 0, 0, 94, 79, 162, 0, 93, 79, 162}; // 颜色buffer,其实很长,没有拷完,详见源码内例子,数组内
	unsigned char* colors = mixed_data;
	size_t ncolors = sizeof(mixed_data)/sizeof(mixed_data[0])/4;

	2. 默认颜色表:
	{ "b2w", heatmap_cs_b2w },
	{ "b2w_opaque", heatmap_cs_b2w_opaque },
	{ "w2b", heatmap_cs_w2b },
	{ "w2b_opaque", heatmap_cs_w2b_opaque },
	{ "Blues_discrete", heatmap_cs_Blues_discrete },
	{ "Blues_soft", heatmap_cs_Blues_soft },
	{ "Blues_mixed", heatmap_cs_Blues_mixed },
	{ "Blues_mixed_exp", heatmap_cs_Blues_mixed_exp },
	{ "BrBG_discrete", heatmap_cs_BrBG_discrete },
	{ "BrBG_soft", heatmap_cs_BrBG_soft },
	{ "BrBG_mixed", heatmap_cs_BrBG_mixed },
	{ "BrBG_mixed_exp", heatmap_cs_BrBG_mixed_exp },
	{ "BuGn_discrete", heatmap_cs_BuGn_discrete },
	{ "BuGn_soft", heatmap_cs_BuGn_soft },
	{ "BuGn_mixed", heatmap_cs_BuGn_mixed },
	{ "BuGn_mixed_exp", heatmap_cs_BuGn_mixed_exp },
	{ "BuPu_discrete", heatmap_cs_BuPu_discrete },
	{ "BuPu_soft", heatmap_cs_BuPu_soft },
	{ "BuPu_mixed", heatmap_cs_BuPu_mixed },
	{ "BuPu_mixed_exp", heatmap_cs_BuPu_mixed_exp },
	{ "GnBu_discrete", heatmap_cs_GnBu_discrete },
	{ "GnBu_soft", heatmap_cs_GnBu_soft },
	{ "GnBu_mixed", heatmap_cs_GnBu_mixed },
	{ "GnBu_mixed_exp", heatmap_cs_GnBu_mixed_exp },
	{ "Greens_discrete", heatmap_cs_Greens_discrete },
	{ "Greens_soft", heatmap_cs_Greens_soft },
	{ "Greens_mixed", heatmap_cs_Greens_mixed },
	{ "Greens_mixed_exp", heatmap_cs_Greens_mixed_exp },
	{ "Greys_discrete", heatmap_cs_Greys_discrete },
	{ "Greys_soft", heatmap_cs_Greys_soft },
	{ "Greys_mixed", heatmap_cs_Greys_mixed },
	{ "Greys_mixed_exp", heatmap_cs_Greys_mixed_exp },
	{ "Oranges_discrete", heatmap_cs_Oranges_discrete },
	{ "Oranges_soft", heatmap_cs_Oranges_soft },
	{ "Oranges_mixed", heatmap_cs_Oranges_mixed },
	{ "Oranges_mixed_exp", heatmap_cs_Oranges_mixed_exp },
	{ "OrRd_discrete", heatmap_cs_OrRd_discrete },
	{ "OrRd_soft", heatmap_cs_OrRd_soft },
	{ "OrRd_mixed", heatmap_cs_OrRd_mixed },
	{ "OrRd_mixed_exp", heatmap_cs_OrRd_mixed_exp },
	{ "PiYG_discrete", heatmap_cs_PiYG_discrete },
	{ "PiYG_soft", heatmap_cs_PiYG_soft },
	{ "PiYG_mixed", heatmap_cs_PiYG_mixed },
	{ "PiYG_mixed_exp", heatmap_cs_PiYG_mixed_exp },
	{ "PRGn_discrete", heatmap_cs_PRGn_discrete },
	{ "PRGn_soft", heatmap_cs_PRGn_soft },
	{ "PRGn_mixed", heatmap_cs_PRGn_mixed },
	{ "PRGn_mixed_exp", heatmap_cs_PRGn_mixed_exp },
	{ "PuBuGn_discrete", heatmap_cs_PuBuGn_discrete },
	{ "PuBuGn_soft", heatmap_cs_PuBuGn_soft },
	{ "PuBuGn_mixed", heatmap_cs_PuBuGn_mixed },
	{ "PuBuGn_mixed_exp", heatmap_cs_PuBuGn_mixed_exp },
	{ "PuBu_discrete", heatmap_cs_PuBu_discrete },
	{ "PuBu_soft", heatmap_cs_PuBu_soft },
	{ "PuBu_mixed", heatmap_cs_PuBu_mixed },
	{ "PuBu_mixed_exp", heatmap_cs_PuBu_mixed_exp },
	{ "PuOr_discrete", heatmap_cs_PuOr_discrete },
	{ "PuOr_soft", heatmap_cs_PuOr_soft },
	{ "PuOr_mixed", heatmap_cs_PuOr_mixed },
	{ "PuOr_mixed_exp", heatmap_cs_PuOr_mixed_exp },
	{ "PuRd_discrete", heatmap_cs_PuRd_discrete },
	{ "PuRd_soft", heatmap_cs_PuRd_soft },
	{ "PuRd_mixed", heatmap_cs_PuRd_mixed },
	{ "PuRd_mixed_exp", heatmap_cs_PuRd_mixed_exp },
	{ "Purples_discrete", heatmap_cs_Purples_discrete },
	{ "Purples_soft", heatmap_cs_Purples_soft },
	{ "Purples_mixed", heatmap_cs_Purples_mixed },
	{ "Purples_mixed_exp", heatmap_cs_Purples_mixed_exp },
	{ "RdBu_discrete", heatmap_cs_RdBu_discrete },
	{ "RdBu_soft", heatmap_cs_RdBu_soft },
	{ "RdBu_mixed", heatmap_cs_RdBu_mixed },
	{ "RdBu_mixed_exp", heatmap_cs_RdBu_mixed_exp },
	{ "RdGy_discrete", heatmap_cs_RdGy_discrete },
	{ "RdGy_soft", heatmap_cs_RdGy_soft },
	{ "RdGy_mixed", heatmap_cs_RdGy_mixed },
	{ "RdGy_mixed_exp", heatmap_cs_RdGy_mixed_exp },
	{ "RdPu_discrete", heatmap_cs_RdPu_discrete },
	{ "RdPu_soft", heatmap_cs_RdPu_soft },
	{ "RdPu_mixed", heatmap_cs_RdPu_mixed },
	{ "RdPu_mixed_exp", heatmap_cs_RdPu_mixed_exp },
	{ "RdYlBu_discrete", heatmap_cs_RdYlBu_discrete },
	{ "RdYlBu_soft", heatmap_cs_RdYlBu_soft },
	{ "RdYlBu_mixed", heatmap_cs_RdYlBu_mixed },
	{ "RdYlBu_mixed_exp", heatmap_cs_RdYlBu_mixed_exp },
	{ "RdYlGn_discrete", heatmap_cs_RdYlGn_discrete },
	{ "RdYlGn_soft", heatmap_cs_RdYlGn_soft },
	{ "RdYlGn_mixed", heatmap_cs_RdYlGn_mixed },
	{ "RdYlGn_mixed_exp", heatmap_cs_RdYlGn_mixed_exp },
	{ "Reds_discrete", heatmap_cs_Reds_discrete },
	{ "Reds_soft", heatmap_cs_Reds_soft },
	{ "Reds_mixed", heatmap_cs_Reds_mixed },
	{ "Reds_mixed_exp", heatmap_cs_Reds_mixed_exp },
	{ "Spectral_discrete", heatmap_cs_Spectral_discrete },
	{ "Spectral_soft", heatmap_cs_Spectral_soft },
	{ "Spectral_mixed", heatmap_cs_Spectral_mixed },
	{ "Spectral_mixed_exp", heatmap_cs_Spectral_mixed_exp },
	{ "YlGnBu_discrete", heatmap_cs_YlGnBu_discrete },
	{ "YlGnBu_soft", heatmap_cs_YlGnBu_soft },
	{ "YlGnBu_mixed", heatmap_cs_YlGnBu_mixed },
	{ "YlGnBu_mixed_exp", heatmap_cs_YlGnBu_mixed_exp },
	{ "YlGn_discrete", heatmap_cs_YlGn_discrete },
	{ "YlGn_soft", heatmap_cs_YlGn_soft },
	{ "YlGn_mixed", heatmap_cs_YlGn_mixed },
	{ "YlGn_mixed_exp", heatmap_cs_YlGn_mixed_exp },
	{ "YlOrBr_discrete", heatmap_cs_YlOrBr_discrete },
	{ "YlOrBr_soft", heatmap_cs_YlOrBr_soft },
	{ "YlOrBr_mixed", heatmap_cs_YlOrBr_mixed },
	{ "YlOrBr_mixed_exp", heatmap_cs_YlOrBr_mixed_exp },
	{ "YlOrRd_discrete", heatmap_cs_YlOrRd_discrete },
	{ "YlOrRd_soft", heatmap_cs_YlOrRd_soft },
	{ "YlOrRd_mixed", heatmap_cs_YlOrRd_mixed },
	{ "YlOrRd_mixed_exp", heatmap_cs_YlOrRd_mixed_exp },
封装ImageLayer图层
封装首先在于理解源码内Example osgearth_heatmap处理数据到生成图层的代码逻辑。
对于在OsgEarth上绘制热力图,必要的参数:
- min-level和max-level:对生成图层的瓦片模型层级范围进行限制;
- max_heat: 设置最大热度值,则Add每个点的权重值应当在 0~max_heat中获取;
- colorscheme:颜色表;
- 一组点集(lon、lat、weight);
- osgEarth::ImageLayer.
ImageLayer图层
对于图层的创建,这里需要注意的是,ImageLayer需要支持可写,我的确认方式是搜源码内,osgEarth::TileLayer的虚函数 virtual bool isWritingSupported() const { return false; }在派生的子类Layer里是否重写后返回true。

所以这里确认创建的图层,TMSImage和MBTilesImage驱动才是可行的,否则在如下的openForWriting操作中会提示失败:
	Status outputStatus = m_pLayer->openForWriting();
	if (outputStatus.isError())
	{
		OE_WARN << "Error initializing output: " << outputStatus.message() << std::endl;
		return -1;
	}
如下为我创建ImageLayer的代码(我选择MBTiles的原因其实是不想生成太多分散目录不好删除而已):
	Config outConf;
	std::string key = "driver";
	std::string value = "MBTilesImage";
	//std::string value = "TMSImage";
	std::string path = "heatmap.db";

	outConf.set(key, value);
	outConf.key() = outConf.value("driver");
	outConf.add("profile", m_strProfile);
	outConf.add("url", path);
	outConf.add("format", "png");

	remove(path.data());

	m_pLayer = dynamic_cast<ImageLayer*>(Layer::create(ConfigOptions(outConf)));
	if (!m_pLayer.valid())
	{
		OE_WARN << "Failed to create output layer" << std::endl;
		return -1;
	}

	Status outputStatus = m_pLayer->openForWriting();
	if (outputStatus.isError())
	{
		OE_WARN << "Error initializing output: " << outputStatus.message() << std::endl;
		return -1;
	}
封装接口
如下是我封装的CHeatMapLayer类,提供的对外接口,对应了上述说的绘制热力图所必要的参数:
/**
 * @file HeatMapLayer.h
 * @brief osgEarth热力图图层
 * @note 使用方法:
	Level: 生成图像的级别范围
	MaxHeat: 最大热度值,后面Add点的热度值需在0~MaxHeat范围内
	ColorScheme:颜色表设置方法二选一  1.自定义颜色表值; 2.指定颜色表名称(从默认颜色表中对应)
	Profile: 地理信息
	Point: 经纬度+热度值
 * @author Being
 * @date 2022/7/12
 * @version V00.00.01
 * @CopyRight swiet.com
 */

#ifndef HeatMapLayer_h__
#define HeatMapLayer_h__
#include "osg/ref_ptr"
#include "osgEarth/TileKey"
#include "osgEarth/Profile"
#include "osgEarth/ImageLayer"

class CHeatMapLayer
{
public:
	CHeatMapLayer();
	~CHeatMapLayer();

	// default 0-8
	void SetLevelRange(size_t nMinLevel, size_t nMaxLevel);

	// default 100 (heat>=0.0)
	void SetMaxHeatWeight(float fMaxHeat);

	// colorscheme_name
	void SetColorScheme(const std::string& strColorScheme);

	// custom colorsceme
	void SetColorScheme(unsigned char* colors, size_t ncolors);

	// default global-geodetic
	void SetProfile(const std::string& strProfile);

	bool AddPoint(double dLon, double dLat, double dWeight);

	bool BuildLayer();

	void TearDownLayer();

	osgEarth::Layer* GetLayer() const;

private:

	bool WriteKey();

protected:

	size_t m_nMinLevel;
	size_t m_nMaxLevel;
	float m_fMaxHeatWeight;

	std::string m_strColorScheme;
	unsigned char* m_colors;
	size_t m_nColorCnt;

	std::string m_strProfile;
	osg::ref_ptr<const osgEarth::Profile> m_profile;

	osg::ref_ptr<osgEarth::ImageLayer> m_pLayer;

	typedef std::unordered_map<unsigned short, float> CellIndex;
	typedef std::unordered_map<osgEarth::TileKey, CellIndex> TileKeyMap;
	TileKeyMap m_keys;

};

#endif // HeatMapLayer_h__
瓦片模型
在AddPoint函数内,根据经纬度以及指定的Level,生成对应瓦片模型下所需的TileKey,这里其实也是Example里面拷过来的代码:
bool CHeatMapLayer::AddPoint(double dLon, double dLat, double dWeight)
{
	if (!m_profile->isOK())
	{
		OE_WARN << "profile error" << std::endl;
		return false;
	}

	if (dLon >= -180.0 && dLon <= 180.0 &&
		dLat >= -90 && dLat <= 90.0 &&
		dWeight >= 0.0)
	{
		for (unsigned int level = m_nMinLevel; level <= m_nMaxLevel; ++level)
		{
			TileKey key = m_profile->createTileKey(dLon, dLat, level);

			GeoExtent extent = key.getExtent();

			unsigned int x = osg::clampBetween((unsigned int)(256.0 * (dLon - extent.xMin()) / extent.width()), 0u, 255u);
			unsigned int y = osg::clampBetween((unsigned int)(256.0 * (dLat - extent.yMin()) / extent.height()), 0u, 255u);
			unsigned short index = (unsigned short)(y * 256 + x);
			m_keys[key][index] += dWeight;
		}

		return true;
	}

	return false;
}
图像数据处理
在WriteKey函数内,也是整理了Example里面的图像处理部分代码,处理TileKey对应的影像数据,该数据由heatmap.h里的接口,结合colorscheme进行处理,最终在外部调用BuildLayer时,创建图层并进行图像处理,获得完整的ImageLayer热力图图层。
bool CHeatMapLayer::WriteKey()
{
	if (NULL == m_pLayer)
	{
		return false;
	}

	// tilekey
	if (m_keys.empty())
	{
		return false;
	}

	// color
	heatmap_colorscheme_t colorScheme;
	if (m_strColorScheme.empty() && m_nColorCnt == 0)
	{
		colorScheme.colors = heatmap_cs_default->colors;
		colorScheme.ncolors = heatmap_cs_default->ncolors;
	}
	else if (!m_strColorScheme.empty())
	{
		std::map<std::string, const heatmap_colorscheme_t*>::const_iterator itr = g_schemes.find(m_strColorScheme);
		if (itr == g_schemes.end())
		{
			OE_WARN << "Error color scheme name: " << m_strColorScheme << std::endl;
			return false;
		}

		colorScheme.colors = itr->second->colors;
		colorScheme.ncolors = itr->second->ncolors;
	}
	else if (m_nColorCnt > 0)
	{
		colorScheme.colors = m_colors;
		colorScheme.ncolors = m_nColorCnt;
	}

	// write
	unsigned int buffer = 30; // Buffer with neighbor tiles to do some simple metatiling to prevent inconsistent edges along tile boundaries.
	unsigned int numKeys = m_keys.size();
	unsigned int numProcessed = 0;
	for (const auto& key : m_keys)
	{
		unsigned int w = 256;
		unsigned int h = 256;

		// Create the heatmap object with the given dimensions (in pixel).
		heatmap_t* hm = heatmap_new(w + buffer * 2, h + buffer * 2);

		for (auto& cell : key.second)
		{
			unsigned int index = cell.first;

			int r = index / 256;
			int c = index % 256;
			auto hitCount = cell.second;

			int xOffset = 0;
			int yOffset = 0;

			// Add the point but weighted to the number of hits in the cell to get a nice clustered view of the points of the lower levels.
			heatmap_add_weighted_point(hm, c + buffer, r + buffer, hitCount);
		}

		if (buffer > 0)
		{
			for (int i = -1; i <= 1; ++i)
			{
				for (int j = -1; j <= 1; ++j)
				{
					if (!(i == 0 && j == 0))
					{
						TileKey neighborKey = key.first.createNeighborKey(i, j);

						TileKeyMap::iterator neighborItr = m_keys.find(neighborKey);
						if (neighborItr != m_keys.end())
						{
							int xOffset = 0;
							if (neighborKey.getTileX() < key.first.getTileX())
							{
								xOffset = -256;
							}
							if (neighborKey.getTileX() > key.first.getTileX())
							{
								xOffset = 256;
							}
							int yOffset = 0;
							if (neighborKey.getTileY() > key.first.getTileY())
							{
								yOffset = -256;
							}
							if (neighborKey.getTileY() < key.first.getTileY())
							{
								yOffset = 256;
							}

							for (auto& cell : neighborItr->second)
							{
								unsigned short index = cell.first;

								int r = index / 256;
								int c = index % 256;
								auto hitCount = cell.second;

								c += xOffset;
								r += yOffset;

								// Add the point but weighted to the number of hits in the cell to get a nice clustered view of the points of the lower levels.
								heatmap_add_weighted_point(hm, c + buffer, r + buffer, hitCount);
							}
						}
					}
				}
			}
		}

		unsigned int imageSize = hm->w * hm->h * 4;
		unsigned char* imageData = new unsigned char[imageSize];
		heatmap_render_saturated_to(hm, &colorScheme, m_fMaxHeatWeight, imageData);
		osg::ref_ptr< osg::Image > image = new osg::Image;
		image->setImage(hm->w, hm->h, 1, GL_RGBA8, GL_RGBA, GL_UNSIGNED_BYTE, imageData, osg::Image::USE_NEW_DELETE);

		osg::ref_ptr < osg::Image > cropped = ImageUtils::cropImage(image.get(), buffer, buffer, w, h);
		osgEarth::Status s = m_pLayer->writeImage(key.first, cropped.get());

		heatmap_free(hm);

		++numProcessed;
		if (numProcessed % 100 == 0)
		{
			std::cout << "Processed " << numProcessed << " of " << numKeys << " keys" << std::endl;
		}
	}

	return true;
}
外部调用 创建Heatmap
CHeatMapLayer对外的调用接口如下,在一个Demo的View中加载Layer后,效果就如上图的示例展示:
int main(int argc, char** argv)
{
	// map
	osg::Node* globe = osgDB::readNodeFile("../../Data/3d-data/Data/earth/FreeEarth_flat.earth"); // earth内配有高程数据
	osgEarth::MapNode* mapNode = osgEarth::MapNode::get(globe);
	osgEarth::Map* map = mapNode->getMap();

	// viewer
	osgViewer::Viewer viewer;
	viewer.setSceneData(mapNode);

	// Heatmap_layer
	{
		CHeatMapLayer* pHeat = new CHeatMapLayer;
		pHeat->SetLevelRange(0, 20);
		pHeat->SetMaxHeatWeight(100);
		pHeat->SetProfile("global-geodetic");
		//pHeat->SetColorScheme("Oranges_discrete");

		for (int i = 0; i < 1000; i++)
		{
			double dLon = (double)((rand() % 50) + 1080000) / 10000;
			double dLat = (double)((rand() % 50) + 280000) / 10000;
			double dWeight = (double)((rand() % 100));
			pHeat->AddPoint(dLon, dLat, dWeight);
		}

		pHeat->BuildLayer();
		map->addLayer(pHeat->GetLayer());
	}

	// manipulator
	osg::ref_ptr<osgEarth::Util::EarthManipulator> mainManipulator = new osgEarth::Util::EarthManipulator;
	viewer.setCameraManipulator(mainManipulator);

	// run
	viewer.setUpViewInWindow(100, 100, 800, 600);
	viewer.run();

	return 0;
}
最后,OSGEARTH3 上绘制热力图的效果就有了,准确讲,它是作为一个图层加载影像数据的形式展现的:

OsgEarth3 热力图数据处理
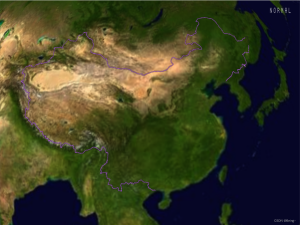
换个角度,也可以把CHeatMapLayer作为热力图影像数据处理类,在BuildLayer函数内,指定生成的heatmap.db文件就是标准的MBTiles格式的文件,用其他的GIS软件打开浏览也是支持的,比如用GlobalMapper打开:


![[转]我国CAD软件产业亟待研究现状采取对策-卡核](https://www.caxkernel.com/wp-content/uploads/2024/07/frc-f080b20a9340c1a89c731029cb163f6a-212x300.png)